How To Install Android-x86 On Ubuntu 18.04?
Technological development in smartphones is very fast. Currently, the Android operating system is one of the OS that is widely used in various smartphone brands. Even if you observe, Android can compete with smartphones like iPhone.
In addition to being used on smartphones, Android is also widely developed by various developers to be able to run on a PC. One of the android OS that you can run on PC device is android x86.
In this article I will explain how to install Android-x86 OS On Ubuntu 18.04. Please prepare some software and applications needed, which I write in the points below!
- Android-x86. You can visit the official website to get the file. Please download the .iso file. In this experiment, I use Android android-x86-8.1-rc1.iso. Please adjust the architecture of your computer, whether using 32 bits or 64 bits.
- Please install the Grub Customizer. For the step of installing grub customizer, you can read the tutorial on this blog about How To Install Grub Customizer.
Steps to install Android x 86 on Ubuntu 18.04!
1. Please create a folder (must enter root) with the name that you want. In this article, I made a folder with the name androidos81 (because I use the Android version version 8.1) Like the picture below!
2. Create a folder with the name "data" (without quotes) in the androidos81 folder, pay attention to the picture below!
3. Next, Please Copy some files from the .iso file from android-x86 that you have prepared earlier into the folder androidos81.
4. The next step is to create a script and boot menu on Grub customizer! Please follow the method below:
- Please open the grub cutomizer application and enter a password for authentication.
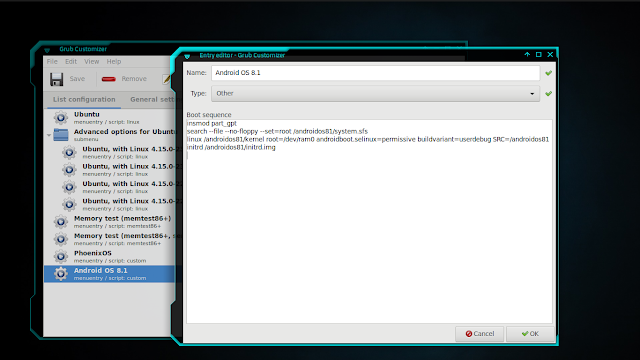
- Create a new file by pressing the paper image icon menu with a + sign, and the Entry editor menu will come out.
- In the Name column, fill in the name for the android-x86 boot menu (I named the boot menu "Android OS 8.1"(without quotes). On the Type, select Other.
- Copy the script below in Boot Sequence:
insmod part_gpt
search --file --no-floppy --set=root /androidos81/system.sfs
linux /androidos81/kernel root=/dev/ram0 androidboot.selinux=permissive buildvariant=userdebug SRC=/androidos81
initrd /androidos81/initrd.img
search --file --no-floppy --set=root /androidos81/system.sfs
linux /androidos81/kernel root=/dev/ram0 androidboot.selinux=permissive buildvariant=userdebug SRC=/androidos81
initrd /androidos81/initrd.img

- Select OK, and select Save menu. Reboot and select the boot menu that was created earlier (Android OS 8.1), press enter. If successful, an Android-x86 splash boot will appear.
In this experiment, I used a computer with a dual core processor and 2 GB RAM and android-x86 OS for 32-bit. And I feel that the OS is running smoothly, although there are some obstacles, such as applications that do not respond and the message "unfortunately app has stopped" comes out.
I created this article based on a video tutorial from Andreas Schmid-Klocke about installing Android-x86 dual boot with android.
May be useful!


